
Maximize Your Sharge Disk Pro 2: Setup, Storage & Hub Features
Learn how to set up, install an SSD, and utilize all features of your Sharge Disk Pro 2, including its HDMI output, card readers, and power delivery, in this comprehensive guide.
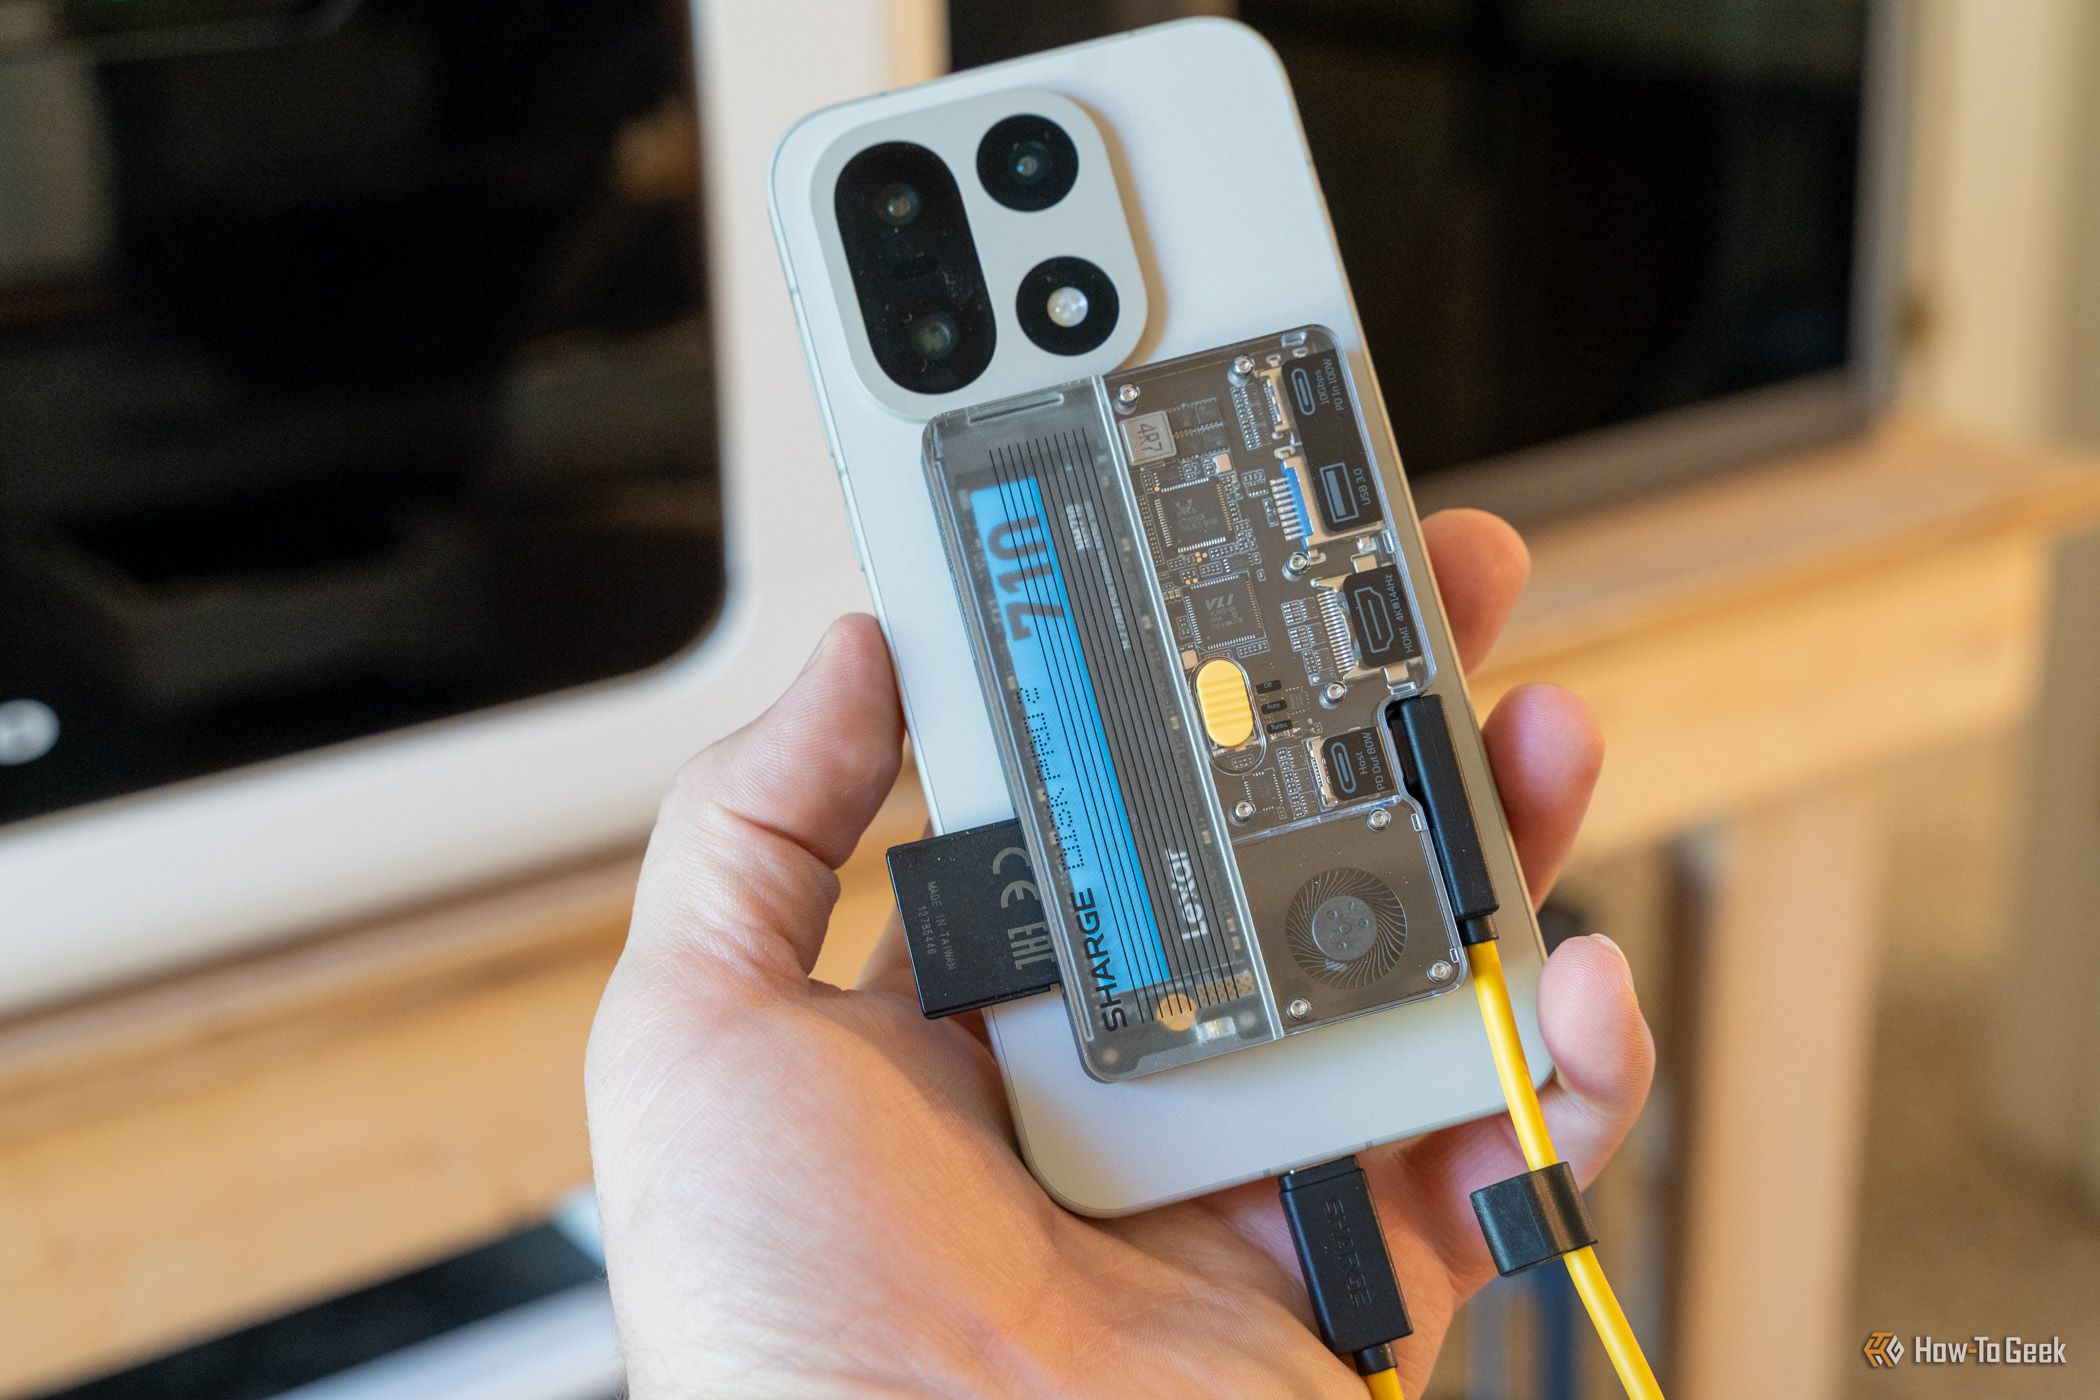
The Sharge Disk Pro 2 stands out as a versatile portable USB-C hub, featuring the significant upgrade of a user-replaceable M.2 NVMe SSD. Building on its predecessor, this device combines portable storage with a comprehensive docking station, offering display output, card readers, and power delivery in a compact form factor. This guide will walk you through setting up your Sharge Disk Pro 2, including installing an SSD, and utilizing its various features to enhance your mobile workflow.
What You'll Accomplish
By following this guide, you will learn to:
- Install or upgrade an M.2 NVMe SSD into your Sharge Disk Pro 2.
- Connect the device to your smartphone, tablet, or laptop.
- Effectively use the Disk Pro 2's various ports, including HDMI, USB-A, and SD/microSD card slots.
- Understand best practices for performance and power delivery.
What You'll Need
Before you begin, gather the following:
- Sharge Disk Pro 2: The portable hub itself.
- M.2 NVMe SSD (optional): If you plan to add or upgrade storage. The device supports up to 2280 form factor NVMe drives.
- Small Phillips Head Screwdriver: To open the Disk Pro 2 enclosure for SSD installation.
- USB-C Enabled Host Device: A smartphone, tablet, or laptop to connect the Disk Pro 2 to.
- USB-C Power Adapter (optional): A 100W USB-C power adapter is recommended if you wish to utilize the 80W passthrough charging feature for your host device.
- HDMI Cable (optional): For connecting to an external display.
- SD/microSD Card (optional): To use the built-in card readers.
Step 1: Installing or Upgrading Your M.2 NVMe SSD
One of the most significant improvements in the Disk Pro 2 is the user-upgradable storage. This allows you to choose your own SSD size or replace it later.
- Open the Enclosure: Carefully unscrew the small screws on the Sharge Disk Pro 2 enclosure. The design allows you to open it up to access the internal components.
- Locate the M.2 Slot: Inside, you'll find the slot designed for an M.2 NVMe SSD. The Disk Pro 2 is compatible with 2280 M.2 NVMe drives, which are widely available.
- Insert the SSD: Gently slide your M.2 NVMe SSD into the slot at an angle. Ensure the notch on the SSD aligns with the key in the slot.
- Secure the SSD: Once inserted, push the SSD down flat. It should then be secured in place, often with a small screw or a tool-less retention clip provided by the enclosure. If a screw is needed, use the appropriate small Phillips head screwdriver.
- Close the Enclosure: Carefully align the two halves of the Disk Pro 2 enclosure and re-fasten the screws to secure it. Do not overtighten.
- Initialize and Format (if new SSD): If you've installed a brand new SSD, you'll need to initialize and format it using your computer's Disk Management (Windows) or Disk Utility (macOS) before it can be used. Connect the Disk Pro 2 to your computer via USB-C, and follow your operating system's instructions for disk setup.
Step 2: Connecting and Powering Your Disk Pro 2
The Disk Pro 2 features a detachable USB-C cable, offering flexibility and easy replacement if damaged.
- Attach the USB-C Cable: Connect the included USB-C cable to the dedicated USB-C port on the Disk Pro 2. Ensure it clicks securely into place.
- Connect to Your Host Device: Plug the other end of the USB-C cable into your smartphone, tablet, or laptop. The Disk Pro 2 should be recognized automatically, and your installed SSD will appear as an external drive.
- Utilize Power Delivery (Optional): If you need to charge your host device while using the hub, connect your 100W USB-C power adapter to the designated USB-C Power Delivery (PD) input port on the Disk Pro 2. This will provide up to 80W passthrough charging to your connected device.
Step 3: Utilizing the Integrated Hub Features
The Disk Pro 2 expands your device's connectivity significantly.
- HDMI Output: Connect an HDMI cable from the Disk Pro 2's HDMI port to an external monitor or TV. The Ultra version supports HDMI 2.1, enabling impressive resolutions like 4K at 144Hz or 8K at 30Hz.
- USB-A Port: Use the USB-A 3.0 port to connect peripherals like a mouse, keyboard, or external hard drive. This is ideal for expanding your workstation capabilities.
- SD/microSD Card Slots: Insert your SD or microSD cards directly into the corresponding slots to quickly transfer photos, videos, or other data to and from your connected device. This eliminates the need for additional card readers.
Tips for Optimal Performance
- SSD Selection: While the Disk Pro 2 supports fast NVMe drives, its USB 3.2 10Gbps connection limits real-world transfer speeds to around 900MB/s write and 800MB/s read. Therefore, a more affordable PCIe 3.0 NVMe drive will be more than sufficient, as a higher-end PCIe 4.0 drive won't see its full potential in this enclosure.
- Cooling Modes: The Disk Pro 2 includes active cooling with three modes to prevent overheating during intensive tasks, such as recording video directly to the SSD or extended use. Utilize these modes to maintain performance and drive longevity.
- Magnetic Attachment: The Disk Pro 2 supports MagSafe and includes a magnetic ring for non-MagSafe devices. This allows you to conveniently attach it to the back of your phone, which is excellent for mobile video recording scenarios.
- Cable Management: Although the detachable cable offers replaceability, ensure it is securely connected to prevent accidental disconnections, especially during travel.
Troubleshooting Common Issues
- SSD Not Detected: After installation, if the SSD isn't recognized, ensure it's properly seated in the M.2 slot and that the enclosure screws are secure. For new drives, remember to initialize and format them through your operating system's disk management tools.
- Slow Transfer Speeds: Confirm your host device supports USB 3.2 10Gbps. While the Disk Pro 2 offers excellent speeds for a portable drive, it won't reach the multi-gigabyte speeds of internal NVMe connections due to the USB interface limitations. Check your cables for proper connection and ensure they are high-quality USB 3.2 compatible cables.
- Display Output Problems: If your HDMI display isn't working, check the HDMI cable connection at both ends. Verify that your host device's drivers are up to date and that your monitor input is set correctly. Try a different HDMI cable if issues persist.
- Charging Issues: If your device isn't charging via passthrough, ensure your input power adapter is at least 100W to provide the 80W output. Also, check that the power adapter is securely connected to the Disk Pro 2's PD input port.
FAQ
Q: What type of SSD can I install in the Sharge Disk Pro 2? A: You can install an M.2 NVMe SSD, with compatibility up to the 2280 form factor. This provides flexibility in choosing your storage capacity.
Q: What are the typical data transfer speeds I can expect? A: Due to its USB 3.2 10Gbps connection, the Disk Pro 2 typically delivers transfer speeds of around 900MB/s for writing and 800MB/s for reading. These speeds are ample for most mobile tasks, including 4K video editing.
Q: Can the Disk Pro 2 charge my laptop while I'm using its other features? A: Yes, the Disk Pro 2 supports 80W USB-C Power Delivery passthrough. To utilize this, you need to connect a 100W USB-C power adapter to the Disk Pro 2's input port, which then delivers up to 80W of power to your connected laptop, phone, or tablet.
Next Steps
With your Sharge Disk Pro 2 fully set up, you're ready to tackle mobile productivity and creative tasks with ease. Explore its capabilities by connecting various peripherals, editing media on the go, or extending your display. If you haven't purchased one yet, the Sharge Disk Pro 2 Ultra is available for pre-order from Sharge, offering exceptional value for its features at $109, especially when compared to separate hub and SSD solutions.
Related articles
Windows 11 Media Creation Tool: The Official Path to Bootable USBs
Verdict: Windows 11 Media Creation Tool - Your Gateway to a Fresh OS Install For anyone looking to install Windows 11, either on a brand-new PC or by performing a clean wipe on an existing one, Microsoft's official

How to Grab the Bissell Cordless Stick Vacuum for $100 Off
Learn how to get the Bissell PowerClean DualBrush Cordless Stick Vacuum for $100 off. This guide details features, benefits, limitations, and provides sequential steps to secure this deal, ensuring you make an informed purchase.

Windows 11 Audio Glitch: Another Update, Another Headache
Quick Verdict Windows 11 users, brace yourselves: the latest security update, KB5124008, has introduced a frustrating audio bug. If you rely on older USB Audio Class 1.0 devices like some headsets or speakers, you might

Only at TechCrunch Disrupt 2026: What happens when OpenAI ships your
AI founders face an unprecedented challenge: their core products becoming features of rapidly evolving foundation models from giants like OpenAI. TechCrunch Disrupt 2026 will host a critical session on navigating this shift, featuring Michel Tricot (Airbyte), Linda Tong (Webflow), and Rob Toews (Radical Ventures) to discuss building lasting defensibility.
How to Use Kodi: The Simple, Server-Free Way to Watch Your Media
Learn to set up Kodi to watch your personal media library directly on your TV, bypassing complex servers and subscription fees, in just a few steps.

Your Mother Your Mother Your Mother eclipses Marvel’s Blade woes
A new film starring Mahershala Ali and directed by Bassam Tariq, Your Mother Your Mother Your Mother, is generating significant buzz at the Toronto International Film Festival (TIFF) 2026. This powerful hitman thriller,