
How to Harvest Free SATA Drives from Old Electronics
Learn to harvest free SATA hard drives from old electronics like DVRs, laptops, and game consoles in a few steps.
Are you running low on storage space for your PC, but don't want to spend a fortune on new hard drives? Look no further than your closet or garage! Many forgotten electronic devices contain perfectly functional SATA hard drives that can be repurposed for your computer. This guide will walk you through the process of extracting and preparing these "free" storage solutions, turning your old gadgets into valuable assets.
What You'll Accomplish
By following this guide, you will learn how to safely retrieve standard SATA hard drives from common household electronics like old DVRs, defunct laptops, and retired game consoles. You'll then transform these drives into usable storage for your Windows or Mac PC, either as internal drives or as portable external storage, all without spending a dime on the drive itself.
What You'll Need
Before you begin your tech treasure hunt, gather these essential tools and components:
- Phillips-head Screwdriver: The most crucial tool for opening most devices.
- Small Flathead Screwdriver or Pry Tools (Optional): Useful for prying open plastic casings on some laptops or consoles without damaging them.
- Anti-static Wrist Strap (Recommended): To prevent static discharge from harming sensitive electronic components.
- Your Decommissioned Devices: Old DVRs, laptops (even non-working ones), PlayStation 3/4, Xbox 360/One consoles.
- A Working PC: To connect and format the harvested drives.
- SATA Data and Power Cables (for internal PC use): If you plan to install the drive inside your desktop computer.
- USB-to-SATA Adapter or External Drive Enclosure (Recommended for flexibility):
- 2.5-inch enclosure: For laptop and game console drives.
- 3.5-inch enclosure: For DVR drives.
Important Considerations Before You Begin
- Safety First: Always ensure the device you are disassembling is unplugged and completely powered down. Be mindful of sharp edges inside electronics.
- Data Privacy: If the device contains sensitive personal data, remember that simply extracting the drive doesn't erase it. You'll need to wipe and reformat the drive using your PC's disk management tools, which this guide covers.
- Drive Condition: While many drives from dead electronics are perfectly fine, there's always a small chance a drive might be faulty. Proceed with the understanding that not every drive will be a success.
- Drive Size: Be aware that DVRs typically house larger 3.5-inch drives, while laptops and game consoles use more compact 2.5-inch drives.
Step-by-Step Guide: Harvesting and Repurposing Your Drives
This process involves two main phases: physically extracting the drive and then preparing it for use on your computer.
Phase 1: Physical Extraction
The method for opening devices varies, but the core idea is to carefully access the internal components and locate the hard drive.
1. General Disassembly Tips:
- Work on a clean, well-lit surface. Place a cloth or mat underneath to prevent scratches.
- Keep track of screws! A small container or a magnetic mat can help you remember where each screw came from.
- Don't force anything. If a part isn't moving easily, double-check for hidden screws or clips.
2. Extracting from DVRs:
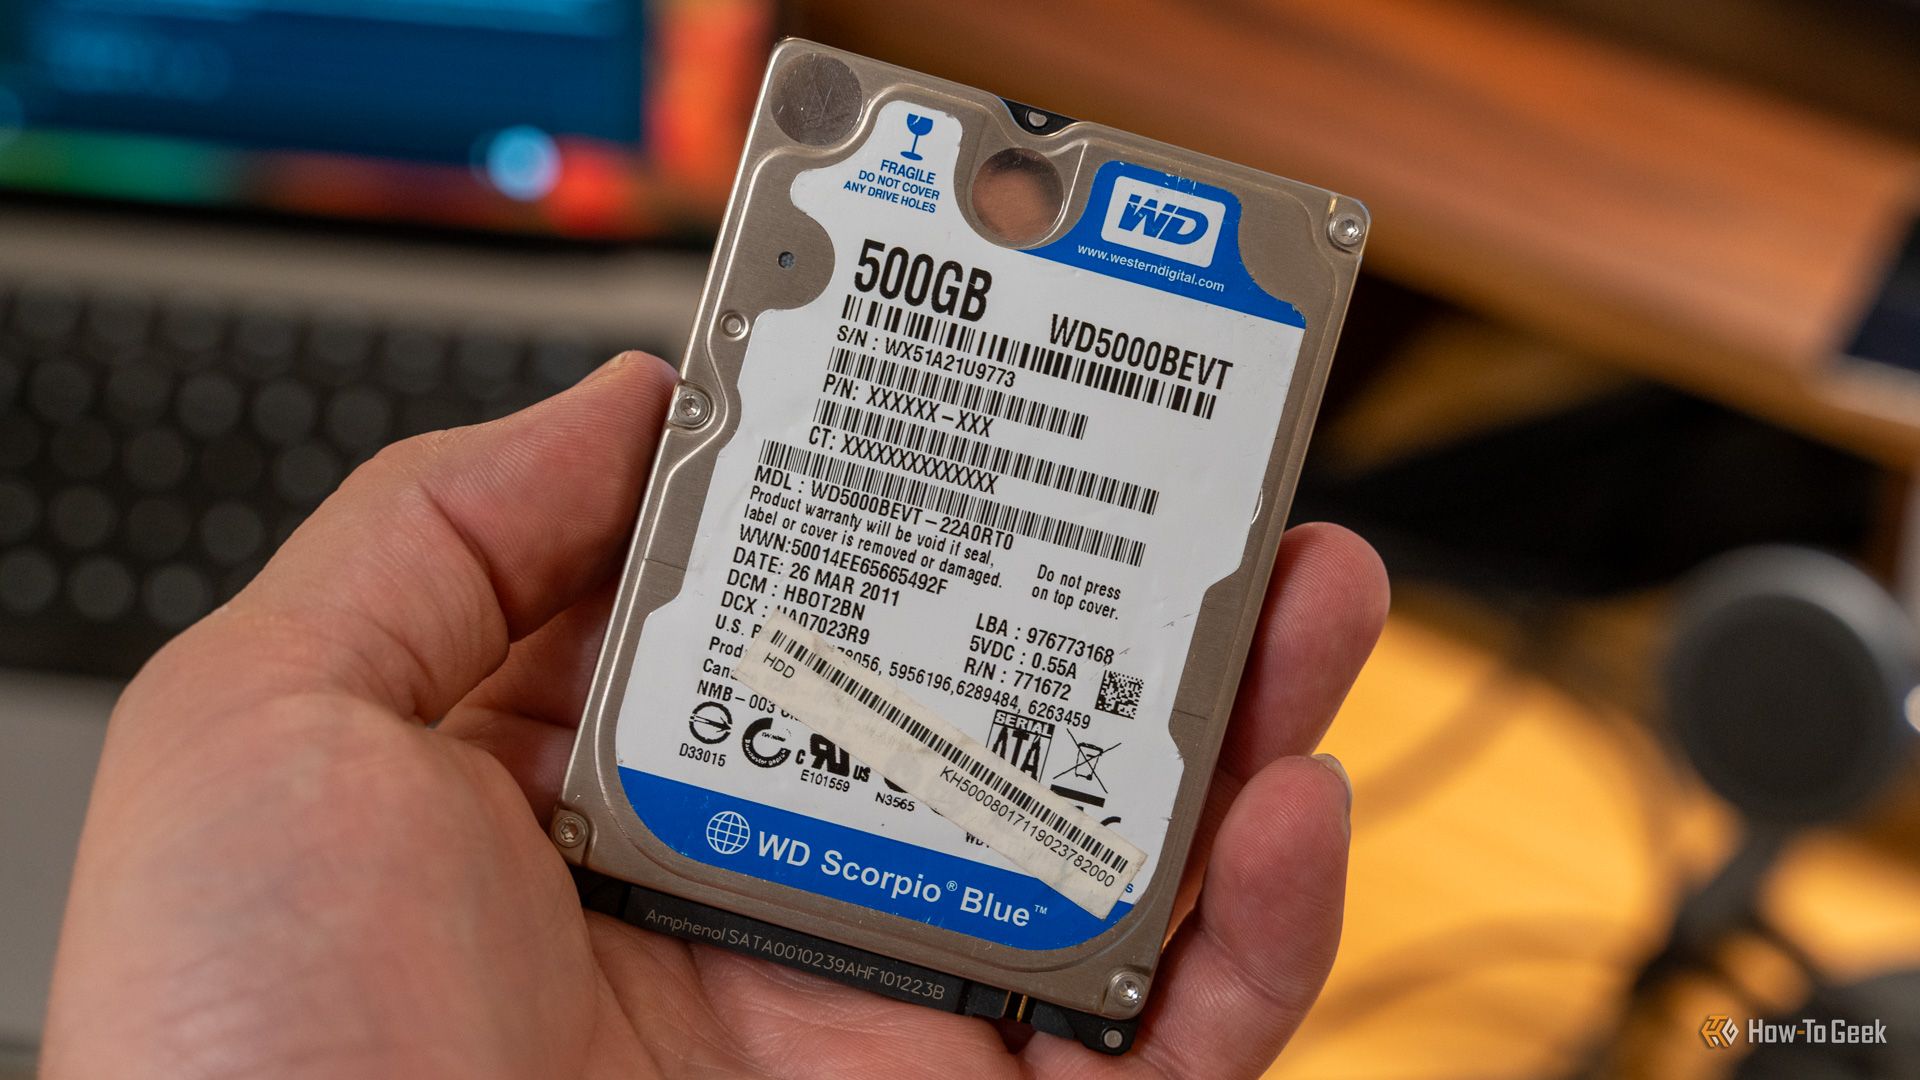
DVRs are excellent sources for robust 3.5-inch hard drives, often designed for continuous operation. These drives typically range from 500 gigabytes to 2 terabytes.
- Locate Casing Screws: Most DVRs have several Phillips-head screws on the back or sides that secure the outer casing. Remove these screws.
- Remove the Casing: Carefully slide or lift off the top cover. You might need to gently pry it if it's snug.
- Identify the Hard Drive: The hard drive will be a rectangular metal box, usually mounted within a cage or directly to the chassis. It will have two cables connected to its back: a wider SATA data cable and a narrower SATA power cable.
- Disconnect and Remove: Disconnect both the SATA data and power cables by gently pulling them straight out. Then, unscrew any mounting screws holding the drive in place and carefully lift it out.
3. Extracting from Old Laptops:
Laptops, even those with cracked screens or dead motherboards, often contain perfectly functional 2.5-inch hard drives or even faster solid-state drives (SSDs) if they're newer models. Capacities typically range from 320 gigabytes to 1 terabyte for HDDs.
- Locate Access Panel: Many older laptops feature a dedicated access panel on the bottom, usually secured by one or two small Phillips-head screws. This panel often covers the hard drive, RAM, or Wi-Fi card.
- Remove Panel and Drive: Unscrew the panel and gently remove it. The hard drive will likely be in a caddy or directly slotted into a SATA connector. You may need to slide it out laterally or lift it slightly to disconnect it.
- If No Access Panel: For some laptops, you might need to remove the entire bottom case. This involves more screws and potentially gentle prying around the edges. Look for online guides specific to your laptop model if you're unsure.
4. Extracting from Game Consoles (PlayStation 3/4, Xbox 360/One):
Game consoles from the PS3/PS4 and Xbox 360/One generations use standard 2.5-inch SATA hard drives, just like laptops. These can range from 250 gigabytes to 1 terabyte.
- PlayStation Consoles (PS3, PS4): Sony designed these for user upgrades, making drive extraction quite simple.
- Locate Hard Drive Bay: On PS4, for example, it's often a plastic cover on the side or back. Slide this cover off.
- Remove Single Screw: You'll typically find a single, branded screw (often with PlayStation symbols) securing the drive caddy. Unscrew it.
- Slide Out Drive: Gently pull out the caddy, and then remove the drive from the caddy itself.
- Xbox Consoles (Xbox 360, Xbox One): These require a bit more effort to open, but the underlying drive is still a standard component.
- Disassemble Outer Shell: You'll need to carefully unclip and remove the outer plastic shell of the console. This often involves prying tools and patience. Search for specific guides for your Xbox model.
- Locate and Remove Drive: Once the internal components are exposed, identify the 2.5-inch hard drive. It will be connected via standard SATA power and data cables, similar to a DVR, but smaller. Disconnect the cables and unscrew any mounting brackets.
Phase 2: Preparing the Drive for Use
Once you've extracted the drive, it's time to make it usable for your PC. Game consoles and DVRs use proprietary file systems that your Windows or Mac computer won't immediately recognize.
1. Connect the Drive to Your PC:
- External Connection (Recommended for initial setup): This is the easiest way. Connect your harvested drive to a USB-to-SATA adapter or place it into an external drive enclosure, then plug it into a USB port on your PC.
- Internal Connection: If you're confident, you can install the drive directly into your desktop PC using available SATA data and power cables. Ensure your PC is off and unplugged before opening it.
2. Access Your Computer's Disk Management Utility:
- Windows: Right-click the Start button, then select "Disk Management." Alternatively, search for "Disk Management" in the Start menu.
- macOS: Open "Disk Utility" (found in Applications > Utilities).
3. Initialize, Wipe, and Format the Drive:
When you open the utility, you might see a prompt to initialize a new disk. If not, look for your newly connected drive. It will likely appear as "Unallocated" space, or with multiple unrecognized partitions (especially from consoles).
- Delete Existing Partitions: Right-click on any existing partitions on the harvested drive and select "Delete Volume" (Windows) or "Erase" (macOS) until the entire drive appears as a single block of "Unallocated" space.
- Initialize the Disk (Windows only): If prompted or if the disk shows as "Not Initialized," right-click it and select "Initialize Disk." Choose "GPT" (GUID Partition Table) for modern systems and drives over 2TB, or "MBR" for older systems or smaller drives.
- Create New Simple Volume (Windows): Right-click the "Unallocated" space and select "New Simple Volume." Follow the wizard to assign a drive letter and choose a file system. For general use, NTFS is best for Windows, and exFAT is good for cross-platform compatibility. Give it a name like "Harvested Drive."
- Erase and Format (macOS): Select the entire drive (not just a partition) in Disk Utility. Click "Erase." Choose a name, format (e.g., APFS for newer macOS, Mac OS Extended (Journaled) for older, or exFAT for cross-platform), and scheme (GUID Partition Map). Click "Erase" again.
Once formatted, your drive should appear in "My Computer" (Windows) or "Finder" (macOS) as usable storage!
Troubleshooting Tips
- Drive Not Detected:
- Double-check all connections: USB adapter, SATA cables, power cable.
- Try a different USB port or another USB-to-SATA adapter if you have one.
- In Windows Device Manager, check if the drive appears under "Disk drives" with a yellow exclamation mark. If so, try updating or reinstalling the driver.
- Errors During Formatting:
- This could indicate the drive is failing. Try using a third-party disk utility like MiniTool Partition Wizard (Windows) or GParted (Linux bootable USB) for more advanced options.
- Run a disk health check (e.g., using CrystalDiskInfo on Windows) to assess the drive's condition.
- Slow Performance: Older mechanical hard drives, especially those from DVRs, might not be as fast as modern SSDs. Manage your expectations, and consider these drives for less performance-intensive tasks like backups or secondary storage.
Tips for Repurposed Drives
- Backup Storage: These drives are perfect for creating local backups of important photos, documents, and other files.
- Secondary Data Drive: Install them internally in your desktop to store games, media files, or large project files, freeing up space on your primary drive.
- Portable External Storage: Using a cheap USB enclosure, laptop and console drives become excellent rugged portable drives for moving large files between computers.
- Media Server: A larger DVR drive can be an ideal component for a DIY network-attached storage (NAS) device or media server.
Next Steps
Now that you have successfully harvested and repurposed your free SATA drives, consider organizing your digital life with your new storage. Explore options for automating backups, categorizing your media library, or even creating a bootable recovery drive. Don't forget to properly dispose of the remaining components of your old electronics at an e-recycling facility.
FAQ
Q: Are these harvested drives reliable for long-term storage? A: Many drives harvested from DVRs are particularly robust, as they are engineered for continuous, demanding read and write cycles. Laptop drives are also designed to withstand physical movement. While not brand new, a successfully formatted drive that passes initial health checks should provide reliable storage, especially for secondary uses or backups. It's always wise to follow the 3-2-1 backup rule for critical data, regardless of the drive's origin.
Q: Can I really get an SSD from an old laptop? A: Yes! Newer laptops from the mid-2010s onward often feature solid-state drives. If you manage to harvest an SSD, you'll benefit from significantly faster read and write speeds compared to traditional hard disk drives, making it an even more valuable score for your PC.
Q: What if the harvested drive has a very small capacity, like 250GB? Is it still useful? A: Absolutely! Even smaller drives have their uses. They can be excellent for storing documents, light applications, or serving as a dedicated backup for a specific category of files. You could also use it to install a lightweight operating system (like a Linux distribution) for a secondary boot drive or to create a rescue disk for troubleshooting other computers.
Related articles
Unleash Hidden Network Potential with a $10 USB Ethernet Adapter
Is your sleek, modern laptop missing an essential Ethernet port? Or perhaps you're experiencing unexpected network bottlenecks on devices you thought were well-connected? A simple USB-to-Ethernet adapter, often costing

How to Evaluate the 2026 Hyundai Ioniq 5 N's New Price and Upgrades
Learn to evaluate the 2026 Hyundai Ioniq 5 N's significant price drop and enhanced features to decide if this enthusiast EV is right for you.

Pentagon Halts 155 Wind Projects in 24 States Over Drone Fears
The Pentagon has frozen permitting for 155 wind projects across 24 states for nearly a year, citing concerns that drones can hide within wind farms. This impacts 44 gigawatts of capacity and has cost developers $2 billion. The wind industry claims the freeze is politically motivated and has filed a lawsuit.

The SaaS Survival Guide: AI's Impact & Workday's Strategy Reviewed
ZDNet's article, "'The SaaS apocalypse is overrated': How Workday and other software providers plan to survive AI," offers a refreshingly balanced and insightful perspective on a topic often shrouded in sensationalism.

in-depth: Chewy Promo Codes: $20 Off July 2026: coupons — Key Details
Pet owners can find substantial savings at Chewy in July 2026. New customers get $20 off first orders (code WELCOME) and free shipping. Existing users benefit from exclusive deals, Autoship discounts, and a Chewy+ membership for ongoing perks and rewards.
How to Reclaim 22GB on Your Samsung Phone Without Deleting Important
Learn to effectively free up significant storage space on your Samsung phone by emptying trash, removing duplicates, archiving apps, clearing caches, and managing offline files in just a few steps, without sacrificing your essential data.