
Ditch Plex: Set Up Your Free, Private Jellyfin Media Server
Transition from Plex to Jellyfin and set up a free, private, self-hosted media server. Learn the benefits of Jellyfin's open-source model, enhance your privacy, and easily configure remote access using tools like Tailscale.
For years, Plex was a popular choice for home media servers, offering a centralized spot for movies, music, and TV shows. However, recent changes have left many long-term users frustrated. Plex has shifted its focus towards monetization, introducing bloat, ad-supported content, and paywalls for features that used to be standard, like remote access and hardware-accelerated transcoding.
If you're tired of subscriptions and crave full control over your media, it's time to explore a powerful, open-source alternative: Jellyfin. This guide will walk you through transitioning from Plex to Jellyfin, giving you a free, private, and customizable media server experience without looking back.
Why Make the Switch to Jellyfin?
Plex's evolution has prioritized profit over the core user experience. Its interface has become cluttered with content you don't own, and basic functionalities are now locked behind a premium Plex Pass subscription. For instance:
- Remote Watch Pass: Non-premium users must pay an annual or monthly fee to stream their own files from their home servers to mobile devices when away from home, even with direct port forwarding.
- Hardware-Accelerated Transcoding: This essential feature, which converts high-bitrate files in real-time for different devices and network speeds, is paywalled. Without it, Plex relies on less efficient software-based CPU transcoding, causing even high-end processors to struggle with demanding tasks like 4K HDR to 1080p SDR conversion.
Jellyfin, on the other hand, is completely free and open-source. It offers:
- Out-of-the-Box Hardware Acceleration: Jellyfin freely utilizes your server's GPU (with technologies like Intel Quick Sync Video, Nvidia NVENC, or AMD AMF) for efficient transcoding, enhancing your streaming experience without extra cost.
- Enhanced Privacy: Jellyfin never sends your data back to a central server. It uses local authentication, ensuring your viewing habits, user profiles, and library contents remain strictly on your own hardware. Unlike Plex, which handles authentication through external cloud servers, Jellyfin keeps your personal media truly private.
- Centralized Library Management: Similar to Plex, Jellyfin acts as a centralized server that indexes your entire media library, manages all metadata, and tracks your watched status down to the second. This means you can pause a movie on your living room TV and resume it seamlessly on your smartphone.
What You'll Accomplish
By following this guide, you will:
- Successfully set up and configure your own free, private media server using Jellyfin.
- Migrate your existing media library from Plex to Jellyfin.
- Stream your movies, TV shows, and music to any device, anywhere, without paying subscription fees.
- Utilize hardware-accelerated transcoding for smooth, high-quality streaming across various devices.
- Regain full control and privacy over your personal media collection.
Prerequisites and Requirements
Before you begin, ensure you have the following:
- A Dedicated Computer or Server: This could be a Network Attached Storage (NAS), a mini PC, or an always-on desktop computer. This machine will host the Jellyfin server software.
- Your Existing Media Library: Ensure your digital collection of movies, TV shows, music, and photos is organized and accessible on your server.
- A Reliable Internet Connection: Necessary for downloading Jellyfin and configuring remote access.
- Basic Computer Literacy: Familiarity with installing software and navigating file systems.
- For Remote Access (Optional but Recommended): An account with Tailscale (free for personal use) or the willingness to manually configure your router's port forwarding and SSL certificates.
Getting Started with Jellyfin: Your Step-by-Step Guide
Transitioning to Jellyfin is straightforward. Follow these steps to set up your new media server.
Step 1: Download and Install the Jellyfin Server
Jellyfin is available for various operating systems. To get started:
- Visit the Official Jellyfin Website: Navigate to the official Jellyfin download page to find the server software compatible with your operating system (e.g., Windows, Linux, Docker, NAS packages).
- Download the Installer: Choose the appropriate version and download the installer file.
- Run the Installer: Execute the downloaded file and follow the on-screen prompts. The installation process is generally simple and involves accepting terms and choosing an installation directory.
- Initial Setup: Once installed, open Jellyfin in your web browser (usually by navigating to
http://localhost:8096or your server's IP address on port8096). Complete the initial setup wizard, which typically includes creating an administrator user account and setting basic preferences.
Step 2: Add Your Media Libraries
Now, let's get your media into Jellyfin:
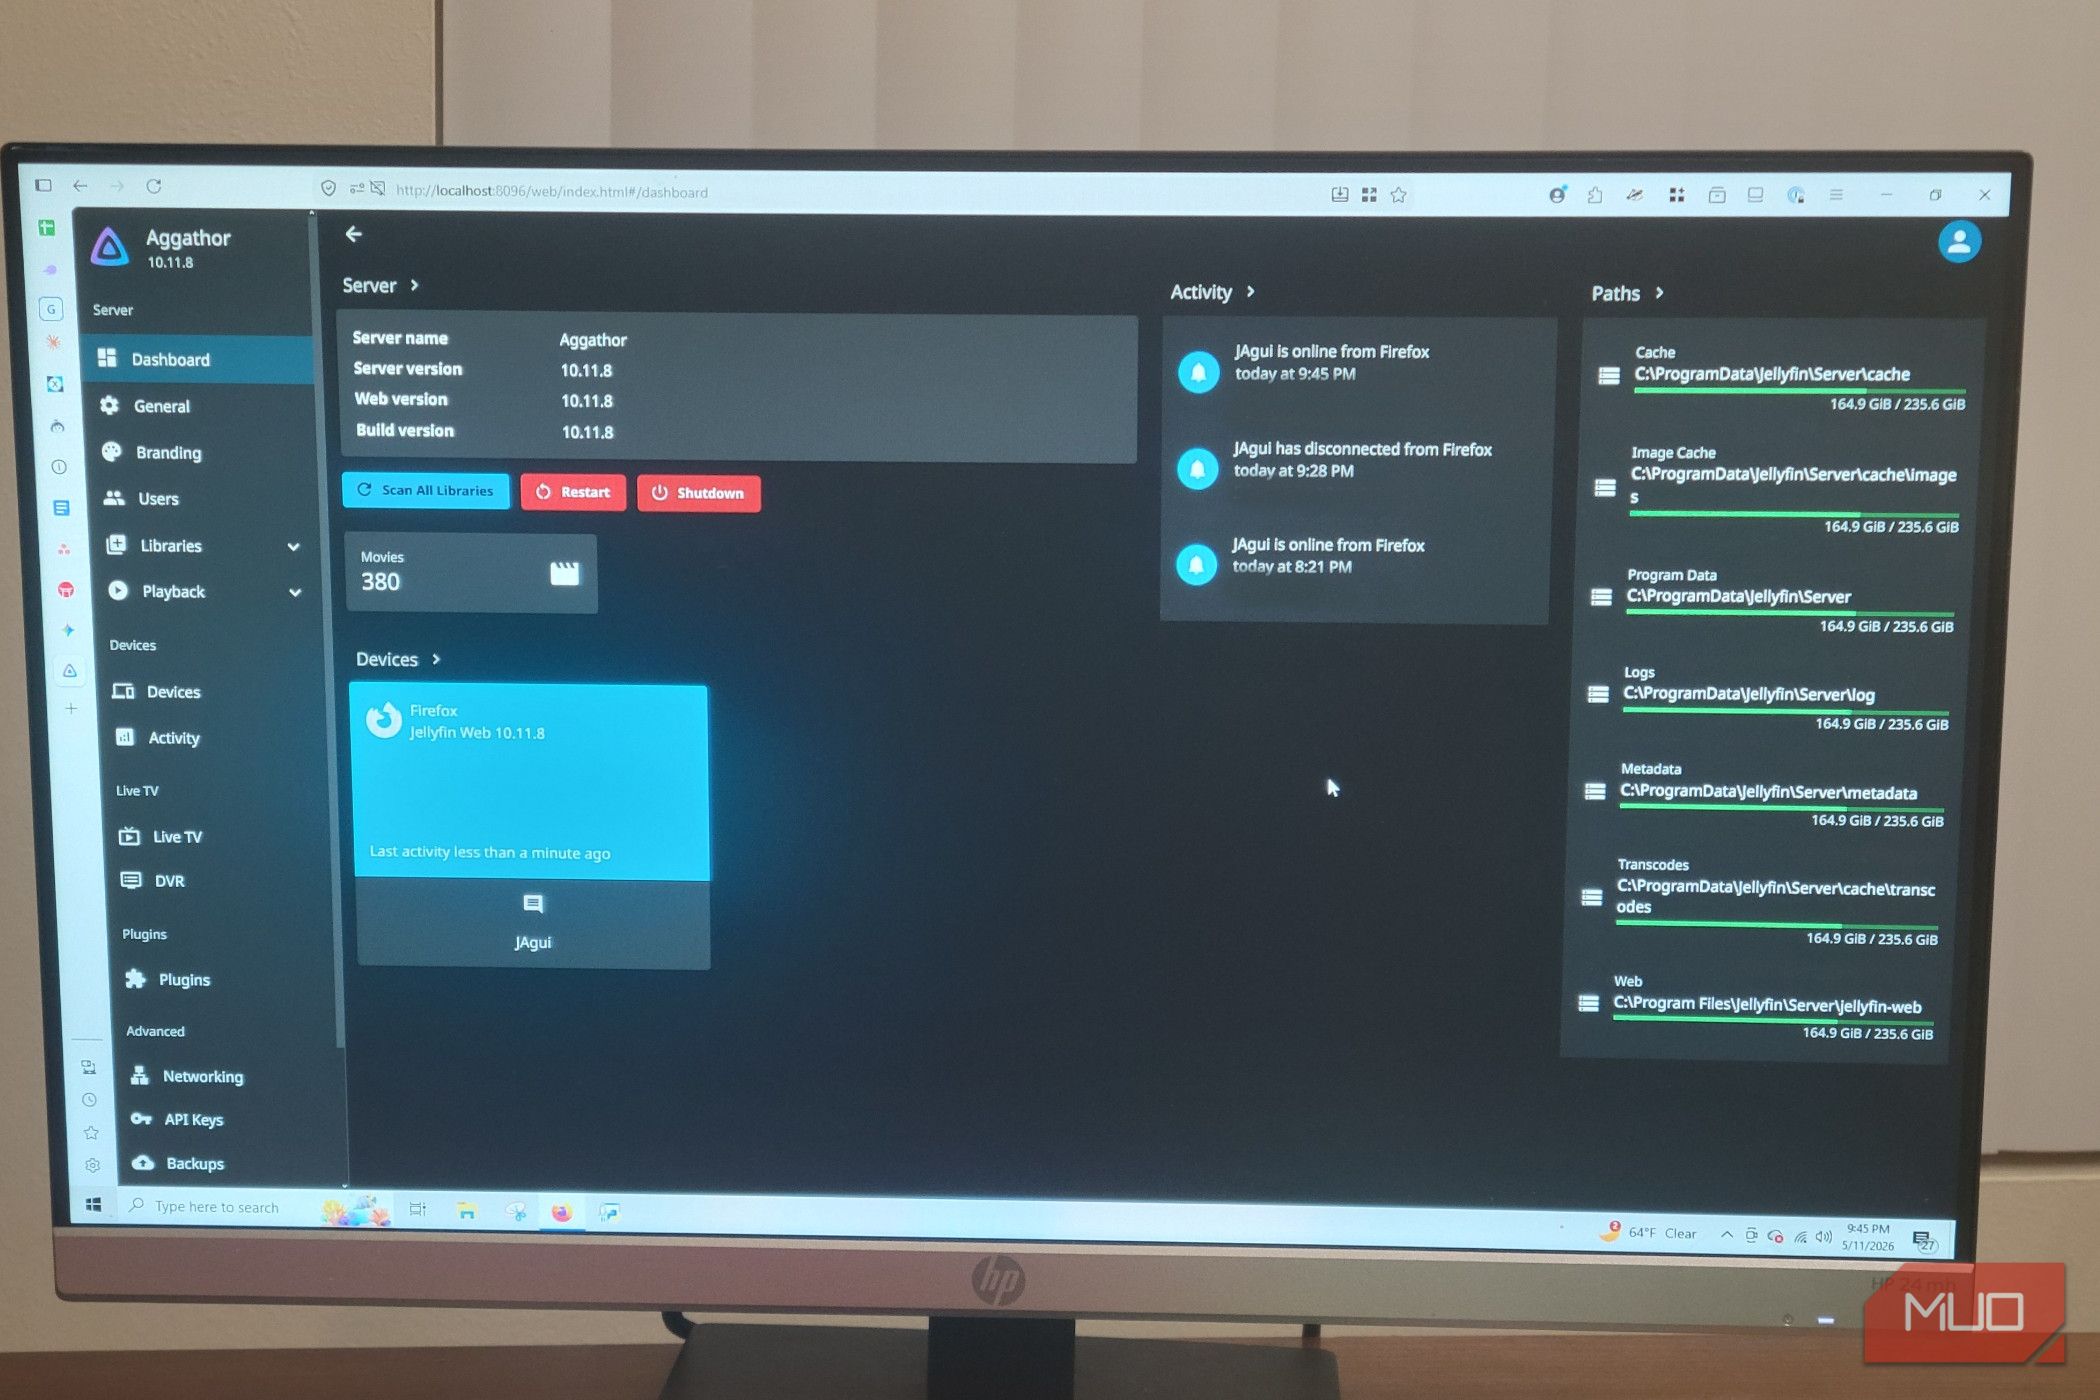
- Access the Dashboard: From the Jellyfin web interface, navigate to the 'Dashboard'.
- Add Media Library: Click on the 'Add Media Library' button. A wizard will guide you through adding different types of media.
- Select Content Type: Choose the type of content you want to add (e.g., 'Movies', 'TV Shows', 'Music').
- Point to Media Folders: Browse to and select the folders on your server where your media files are stored. Jellyfin will then scan these folders.
- Metadata Scanning: Jellyfin will automatically scan your files, identify them, and download rich metadata such as cover art, plot summaries, cast information, and more. This process might take some time depending on the size of your library.
Step 3: Connect Client Devices
Jellyfin supports a wide array of client devices, allowing you to stream your media anywhere:
- Download Client Apps: Visit your device's app store (e.g., Google Play Store for Android, Apple App Store for iOS/iPadOS, Amazon Appstore for Fire TV) or Jellyfin's website for web browser access and other clients.
- Install the App: Download and install the Jellyfin client application on your smartphone, tablet, smart TV, or other viewing devices.
- Connect to Your Server: Open the Jellyfin client app. It will typically ask you to connect to a Jellyfin server. Enter the local IP address of your Jellyfin server (e.g.,
http://192.168.1.100:8096). - Log In: Use the administrator account (or any other user account you've created) to log in. You can now browse and stream your media.
Step 4: Configure Hardware Acceleration (Recommended)
Hardware acceleration is crucial for smooth transcoding. Jellyfin makes this feature available without a subscription:
- Access Server Settings: From the Jellyfin web interface, go to 'Dashboard' -> 'Playback' -> 'Transcoding'.
- Enable Hardware Acceleration: Look for options related to hardware acceleration. Depending on your server's GPU, you might see options for Intel Quick Sync Video, Nvidia NVENC, or AMD AMF.
- Select Your Device: Choose your specific hardware acceleration device and ensure the settings are enabled. Jellyfin's documentation can provide more specific guidance for your hardware setup.
- Save Changes: Apply the settings. This will significantly improve performance when streaming media that requires transcoding for your client devices or network speed.
Overcoming Remote Access Challenges with Tailscale
Plex offers easy remote access through its central relay servers, often requiring no router configuration. Jellyfin, being open-source and privacy-focused, requires you to handle your own networking, which can sound intimidating for beginners (e.g., reverse proxies, SSL certificates, exposing open ports).
The good news is there's an incredibly simple solution: Tailscale.
What is Tailscale?
Tailscale is a zero-configuration VPN built on the WireGuard protocol. It creates a private, encrypted tunnel directly between your devices, no matter where they are. This makes it seem as if all your devices are sitting on your house network, removing the need for complex router configurations.
How to Set Up Remote Access with Tailscale:
- Install Tailscale on Your Server: Download and install the Tailscale application on the machine running your Jellyfin server. This will add your server to your secure 'Tailnet'.
- Install Tailscale on Your Viewing Devices: Download and install the Tailscale app on any device you want to use for remote viewing (smartphone, laptop, tablet).
- Log In to Tailscale: Log in to the Tailscale application on all your devices using the same Tailscale account. This connects them all to your private network.
- Access Jellyfin Remotely: Once connected, you can access your Jellyfin server from any remote device by using its Tailscale IP address (which you can find in your Tailscale dashboard). It's as if you're on your home Wi-Fi network, securely streaming your media.
This method entirely bypasses the need for manual port forwarding on your router, making remote access simple and secure.
Tips and Best Practices
- Organize Your Media: Maintain a consistent and logical folder structure for your media (e.g.,
/Movies/Movie Title (Year)/Movie Title (Year).mkv,/TV Shows/Show Title/Season 01/Show Title - S01E01 - Episode Title.mkv). This helps Jellyfin identify and categorize your content accurately. - Regular Updates: Periodically check for Jellyfin updates through your server's package manager or the official website. Updates bring new features, performance improvements, and security fixes.
- Consider Kodi as a Client: If you enjoy highly customizable interfaces, you can use Kodi as a front-end client with Jellyfin acting as the backend server. Simply install the official Jellyfin add-on for Kodi to integrate your Jellyfin library and maintain centralized watched status.
Troubleshooting
- Slow Streaming or Buffering: If you experience poor performance, especially with high-resolution content, ensure hardware acceleration is properly enabled and configured in your Jellyfin dashboard ('Dashboard' -> 'Playback' -> 'Transcoding').
- Remote Access Issues with Tailscale: Verify that both your Jellyfin server and your remote viewing device are actively logged into Tailscale and show as connected in your Tailscale dashboard. Also, confirm you can access Jellyfin locally first before attempting remote access.
- Media Not Appearing in Library: Check that Jellyfin has read permissions for your media folders on your server. Also, review your file and folder naming conventions to ensure they match common standards, helping Jellyfin correctly identify and scrape metadata.
Next Steps
Congratulations on setting up your Jellyfin media server! Now that you're up and running, consider these next steps:
- Explore Client Apps: Experiment with Jellyfin's various client applications across all your devices to find your preferred viewing experience.
- Dive into Settings: Explore the Jellyfin dashboard for more advanced settings, user management, and customization options.
- Join the Community: The Jellyfin community forums are a great resource for tips, troubleshooting, and discovering plugins or integrations to enhance your server.
FAQ
Q: Why is Jellyfin considered more private than Plex? A: Jellyfin prioritizes user privacy by using local authentication and never sending data back to a central server. Your viewing habits, user profiles, and library contents remain strictly on your own hardware. In contrast, Plex relies on external cloud servers for authentication, meaning your server must verify credentials through a corporate network even when streaming locally.
Q: Do I really need hardware-accelerated transcoding? A: Hardware-accelerated transcoding is crucial for a smooth streaming experience, especially when playing high-bitrate files (like 4K HDR) on devices that require conversion to a lower resolution or different format (e.g., 1080p SDR). Without it, your server's CPU will be solely responsible, which can lead to buffering, stuttering, and poor performance, even on powerful machines.
Q: Can I use Kodi as a media player with Jellyfin? A: Yes! While Kodi is designed as a standalone media player with its own local database, you can use it as a highly customizable front-end client with Jellyfin serving as the powerful backend. Simply install the official Jellyfin add-on for Kodi to integrate your Jellyfin library and maintain centralized watched status across your devices.
Related articles

How to Evaluate the 2026 Hyundai Ioniq 5 N's New Price and Upgrades
Learn to evaluate the 2026 Hyundai Ioniq 5 N's significant price drop and enhanced features to decide if this enthusiast EV is right for you.

Pentagon Halts 155 Wind Projects in 24 States Over Drone Fears
The Pentagon has frozen permitting for 155 wind projects across 24 states for nearly a year, citing concerns that drones can hide within wind farms. This impacts 44 gigawatts of capacity and has cost developers $2 billion. The wind industry claims the freeze is politically motivated and has filed a lawsuit.

Build Your Own Local NMT App with React Native and QVAC
This article explores how Neural Machine Translation (NMT), powered by the Transformer architecture, revolutionized translation by understanding context. We then delve into QVAC, a local-first AI development platform, and its Bergamot engine, enabling private, on-device translation. Learn to set up a React Native app with QVAC and manage model lifecycles for efficient local translation.

Gemini Voice Customization: Your AI, Your Tone
Gemini review: Google's upcoming voice customization offers granular control over Energy, Formality, Warmth, and Speed, marking a shift towards truly personal AI interaction. This beta-discovered feature promises more natural and consistent user experiences, putting Google in a strong position in the evolving AI landscape.

in-depth: Chewy Promo Codes: $20 Off July 2026: coupons — Key Details
Pet owners can find substantial savings at Chewy in July 2026. New customers get $20 off first orders (code WELCOME) and free shipping. Existing users benefit from exclusive deals, Autoship discounts, and a Chewy+ membership for ongoing perks and rewards.
How to Reclaim 22GB on Your Samsung Phone Without Deleting Important
Learn to effectively free up significant storage space on your Samsung phone by emptying trash, removing duplicates, archiving apps, clearing caches, and managing offline files in just a few steps, without sacrificing your essential data.